Snipping Tool
The Snipping Tool: An Overview
The Snipping Tool is a simple yet powerful screen capture application that has been a core utility in Windows operating systems for years. Designed to help users capture, edit, and save screenshots easily, it has become a go-to tool for professionals, students, and everyday users alike. This article dives deep into the Snipping Tool, exploring its features, uses, evolution, and why it remains a critical utility in the digital era.
1. What is the Snipping Tool?
The Snipping Tool is a pre-installed Windows application designed for capturing screenshots of the screen, allowing users to take snapshots of specific areas, entire windows, or the full screen. First introduced in Windows Vista, it has been a staple in most subsequent versions of Windows, including Windows 7, 8, 10, and 11. Over the years, it has evolved, incorporating more advanced features and a modern interface while maintaining its ease of use.
2. Key Features of the Snipping Tool
The Snipping Tool comes with a variety of features that make screen capturing convenient and efficient. Below are its most prominent functionalities:
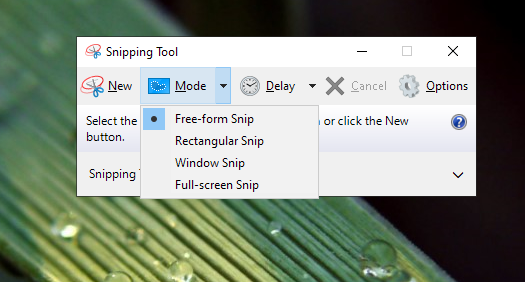
- Snip Modes:
- Free-form Snip: Enables users to draw an irregular shape around the area they want to capture.
- Rectangular Snip: Lets users select a rectangular section of the screen.
- Window Snip: Captures an open window, such as a browser or application.
- Full-screen Snip: Takes a screenshot of the entire screen.
- Annotation Tools: After taking a screenshot, users can annotate the image using the pen, highlighter, and eraser tools. These allow quick markups for presentations, tutorials, or sharing.
- Delayed Capture: The Snipping Tool includes a delay feature that allows users to capture screenshots after a few seconds. This is particularly useful for capturing dropdown menus or tooltips that would disappear when a standard screenshot is taken.
- Save and Share Options: Screenshots can be saved in multiple formats, such as PNG, JPEG, and GIF. They can also be copied to the clipboard for quick sharing via email or messaging platforms.
3. Evolution of the Snipping Tool
Over the years, the Snipping Tool has undergone significant upgrades to enhance functionality and usability. Below is an overview of its evolution:
- Windows Vista and 7:
- The Snipping Tool debuted with basic features like snipping, annotating, and saving images.
- Its simple interface made it an instant favorite for non-technical users.
- Windows 8 and 10:
- A delay feature was introduced, making it possible to capture dynamic elements on the screen.
- Integration with touch-screen devices improved usability for tablets and hybrid laptops.
- Windows 11:
- Microsoft merged the Snipping Tool with the Snip & Sketch app, combining the best of both utilities.
- A modern interface, additional editing tools, and cloud-sharing options made it more versatile.
- New keyboard shortcuts, such as Windows + Shift + S, allow users to access snipping features instantly.
4. How to Use the Snipping Tool
Using the Snipping Tool is straightforward. Here’s a step-by-step guide:
- Open the Tool:
- Search for “Snipping Tool” in the Windows Start menu or use the shortcut Windows + Shift + S (for Windows 10/11).
- Choose a Snip Mode:
- Select the snip type from the mode options (e.g., rectangular, free-form).
- Capture the Screen:
- Drag the cursor around the area you wish to capture, or select a window for window snipping.
- Annotate and Save:
- Use the annotation tools to highlight or mark specific parts of the screenshot.
- Save the image in your desired format.
5. Use Cases for the Snipping Tool
The Snipping Tool is widely used across various industries and scenarios, including:
- Education:
- Teachers use it to create study materials or highlight content during lessons.
- Students capture information from online lectures, e-books, or study websites.
- Workplace:
- Professionals capture and annotate error messages, project updates, or reports for team collaboration.
- Designers and developers use it for documenting website layouts or app interfaces.
- Personal Use:
- Everyday users rely on it for saving images, sharing content from websites, or troubleshooting technical issues.
- Tutorials and Documentation:
- The tool is frequently used to create step-by-step guides and tutorials with annotated screenshots.
Features and Highlights
- The tool is frequently used to create step-by-step guides and tutorials with annotated screenshots.
6. Advantages of the Snipping Tool
The Snipping Tool is favored for its simplicity and functionality. Its advantages include:
- User-Friendly Interface: The tool’s straightforward design makes it accessible even for beginners.
- Customizable Snips: Users can capture specific portions of the screen without cropping or additional editing.
- Built-in Annotations: Quick markups eliminate the need for external image editors.
- Accessibility: It is pre-installed on Windows, eliminating the need for third-party software.
7. Limitations of the Snipping Tool
Despite its benefits, the Snipping Tool has some limitations:
- Lack of Advanced Features: Compared to professional screen capture tools, it lacks advanced options like scrolling capture or video recording.
- Limited Editing Tools: Its annotation capabilities are basic, with no option for text insertion or advanced image manipulation.
- No Cloud Integration in Older Versions: Unlike modern apps, older versions lack seamless cloud integration.
8. Alternatives to the Snipping Tool
For users requiring more advanced features, several alternatives are available:
- Snagit: A premium tool offering scrolling capture, video recording, and extensive editing features.
- Greenshot: A free, open-source tool ideal for professionals needing advanced annotation options.
- Lightshot: A lightweight app that simplifies screenshot sharing online.
9. Tips and Tricks for Maximizing the Snipping Tool
- Use the delay feature to capture transient elements like menus or tooltips.
- Master keyboard shortcuts like Ctrl + C to copy and Ctrl + S to save snips quickly.
- For regular use, pin the Snipping Tool to the taskbar or assign a custom keyboard shortcut.
10. The Future of the Snipping Tool
As Microsoft continues to refine its ecosystem, the Snipping Tool is likely to receive more updates. Future enhancements might include:
- Cloud-based storage integration with OneDrive.
- Improved editing capabilities, such as text overlays and advanced drawing tools.
- Cross-platform compatibility for better functionality across devices.
Conclusion
The Snipping Tool is a versatile and indispensable utility for anyone using a Windows computer. Whether you’re capturing quick notes, sharing visual content, or troubleshooting issues, it simplifies the process and enhances productivity. While it may not replace professional screen capture tools, its ease of use, combined with its pre-installed nature, ensures that it remains a favorite for millions of users worldwide.